Showing posts with label DIY. Show all posts

Thursday, March 10, 2016

DIY Smash Calendar Pocket

Hi,

Here's my diy for Smash book lovers. Hope that help! Someone asked about it so I thought why not to figure it out.


Here's printable calendar. Hope you like it.


Sunday, October 12, 2014

DIY Little Heart Theme on PL cards

I decided to make another on another blank back of recollection. I sprayed some blue ink on it. I use cloud punch with grey paper. I also stamped on grey paper to cut out umberella. I also added little red hearts which was punched out. On second card is from Becky Higgins Seafoam kit. I put washi tape of hearts. I stamped camera and then colored it. I added dot enamel and couple of punched bursts to camera. What do you think? They are for my mini album.


DIY little Balloons on PL card

I decided to do something about the blank back of the Recollections card. I used watercolor to paint it. And then punched out balloons and cut some strings. I also make cute label with word Memories. I  used pencil first before ink it. Finally, make binder holes at the edge for my mini project life album.


Monday, August 4, 2014

My DIY Flairs

I posted in FB group about my handmade flairs. I want to show you what mine looks like. Yeah, I wish I have button maker but for now... I use clear circle epoxy sticker. I make few more on left for Disney PL... I'm sure you could see the right ones for Harry Potter...


I got excited to punch circles from little piece of old gift wrapping. I keep it for long time and am able to reuse. I love the look of wrapping because butterflies are "shining" (foil)


I use watercolor to color Princesses.

I know you can do it too. 

Thursday, June 26, 2014

My DIY cards for my Universal Studio trip

Since there is no Project Life cards for Universal Studios. So I thought I would make my own cards...

I printed some mini photos and then cut them out. I also punched out circular images so I can add epoxy circle stickers on them as flairs. I hand drew banners with names on it. So far I made three and I love it. I will make more later. I also used some washi tapes, enamel dots which was melt from perler beads and cut 3x4 cards from 12x12 sheet.


What do you think? Of course, I miss that place and will plan to visit again someday !

Tuesday, April 22, 2014

My DIY Enamel Dots

When I look at the photos in FB group, I wonder about DIY enamel Dots. I checked on Pinterest board for more information. I thought it is cool, fun and cheap way to do on your own. I tried my old perler and failed badly. I bought new set of perler beads and played with them in different temps. First try wasn't good. Paper got almost burned, perler beads got ruined by high temp. Surfaces are not smooth. I tried again with mid temp. Not bad but they become a little burned. I tried again for the third time. It succeed at temp 300 for about 20 minutes.


I baked some more and then tried to double them up. It is bit challenged to line them up with stripes on it. I melted them and they looked bit strange that they crooked a bit. I used some dots on my project life cards.
I tried again with old perler and they finally worked. I could said about 99% became dots-- it took a long time. At temp 300 for more than an hour! That's what you get for baking the old ones.


I also bought glow in the dark pony beads after heard about them being baked. It is bit big than perler dots. I tried them out for the first time at temp 400 for about 15 minutes. It worked perfectly.


I had fun with them and bought a big basket of perler beads so I can have more dots in other colors. 

Tuesday, December 17, 2013

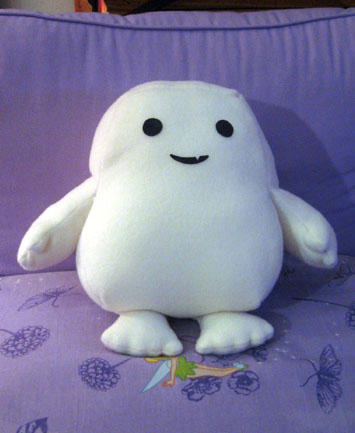
Adipose Plush Pattern


This is my adipose plush.
Someone just asked me where I got adipose pattern from so that she can make a present... It was long time ago... and apparently the website is gone. I was lucky enough to save them. Here's the pattern I used from online but I changed few thing which is not showing (top part and bottom of body corners I turned them into curve shape instead of "L" shape).


See photos of someone else at http://crafty-tardis.livejournal.com/89662.html
Good luck.


Tuesday, October 15, 2013

Adding Washi to the Cards

I still want to make more stuffs with papers and washi. I enjoyed it more than filling them out. LOL.
I added washi to some of my homemade the PL cards for my mini album.

I also added couple of washi to my homemade library card.


Come back if you like to see and read my blog. I post new one when I can. Thanks.

Friday, October 4, 2013

My Own DIY Project Life Cards

After making geo tags of my own, I want to make my own project life cards.
I cut six 3x4 and three 4x6 out of one 12x12 sheet. (You can also cut twelve 3x4 or six 4x6 out of 12x12 sheet.) Then I used some stamps and added some stuffs like a banner, arrow and geo tags. I enjoyed that. I want to make some more in the future. Hope you like my cards. Smile.


Saturday, September 21, 2013

DIY Map Pointer

I somehow saw one paper punch that looks like geo tag/map pointer to me so I thought why not to make my own. Lucky, I have Fiskars Petal by Petal Squeeze Punch (Large) and circle punches. I tried and it works!


Tuesday, March 19, 2013

Mini Album: 3 Ways

I found a cute mini album on pinterest. However, her only "template" didn't help much. So I decided to  make my own template and hope that it helps for someone. I made 3 different ideas as seen in my photos.


Bottom row shows 3 different looks of pockets inside the mini album in which I provided the templates.


I add some pages to attach it with twine. You can do that or sew or use rings. Any way you want/like. This is only an idea I have for myself. I stamped and added pieces of paper in pockets.

Here are templates:


Hope you like mine. I'm off to decorate it more. Enjoy.


Thursday, February 14, 2013

My Homemade Fun Tier Stand

I took it apart so that can understand the steps of how I did it. I just bought 4 colorful trays from Dollar Tree, dowel from Walmart and piece of wooden board from my stepfather cuz it was left over at his shop. I cut holes in trays (careful or will crack it.) I use paper rolls but it is bit thick than regular paper roll (other way can use pvc tube). I just cut dowel to the size I like. Same thing cut the rolls to put between trays. Top it with washer and screw. Hope you like my idea :)


Wednesday, September 5, 2012

DIY Library Cards

It bugs me when I am looking for library cards. There are few online but the cost is... bit high for me.
I tried other ways and none. No such luck.
I even tried to print free card from online but I don't have printer at home. I used printer at library but no color, just black and white.
I gave up.
Then I thought up of something, let's try my way. Take blank index card and also take notebook paper with small lines (small space). I took pen and ruler to match the line pattern and then add one line cross lines. Voila! My new library card!


You can do it! Can use any paper, and line them up with ruler with any pen!!! Can use fine tip Sharpie.
Hope that helps!!!


Thursday, May 31, 2012

DIY Baker's Twine

I saw colorful baker's twine online. I was wondering of its cost. Bit expensive for me. I tried to think of idea to make my own. One idea was to twist 2 color floss together.
Then I saw another idea in Pinterest about make your own baker's twine by using color markers.

So I tried this idea. Luckily, my step-father had a spool of twine. I decided the color I saw online was in airmail style. Here's my result. I like it. Cute.


Go to The Frugal Craft for Make Your Own: Baker's Twine.